OpenMoko In Person

Published on Friday, June 29, 2007

Two weeks ago I had the privilege of meeting up with some of the OpenMoko guys. You've seen me write a little bit about this project, but meeting them and actually getting to play with a device was quite enlightening.

Most foreigners in Taipei take taxis, but not I. My girlfriend gave me a rough estimate how to go to FIC headquarters, yet it was -- rough. I jumped on the right bus, going the right direction, yet didn't really know where to get off. In my broken Chinese I started talking to a group of high school kids, who somewhat pointed me in the right direction. At one point we were coming up to a light and a lady just said: "get off, go down that road." I grabbed my bag and jumped off the bus. The street signs started to resemble the characters I had written down, but I didn't know which direction to go in. I asked a travel agency, and they pointed me in the right direction -- and then it started to rain. I luckily found FIC without getting too wet, and quickly met Sean, the project leader for OpenMoko.

Sean, myself, and several other OpenMoko developers went out to lunch and talked shop. Mickey pulled out a Neo, the hardware platform OpenMoko is going to be based off of. I'll admit, when I saw photos I wasn't really impressed -- but in person, it is pretty sexy. Not too big, but big enough to be functional. In one of my previous posts I mentioned learning C++ back in university, and having basically not touched it since. In a way, I haven't had to, and I've recently found Python, which is just fun. However, I'm so excited about the OpenMoko, I've picked up the K & R bible to read while we are traveling. Not the ideal way to learn a language, but the concepts are somewhat a refresher. I can't wait to play with SIP/IAX on this thing, it will then be my dream phone.

Well, I have one more post to make to get some thoughts off my chest. If you want a postcard, send me an email.

Last Xenful Comments

Published on

One of the biggest things I regret is not utilizing Xen more. I've finally been admitted to Amazon's EC2 Limited Beta, just two days before I leave, so not enough time to actually do anything fun. However, I think Xen is an ideal infrastructure aid for SMEs in particular. The cost of technology is continuing to decrease, which means bigger servers cost less. This is great for the small/branch office. Let me explain.

One of the themes I noticed while studying and taking the MCSE was that the solution to the majority of the problems was to just buy more servers. Even for simple things like DHCP, buy another server. I've always operated on a limited budget, and anyways, I don't think money should be wasted on resources when it isn't needed. With a VT chipset, you aren't tied to any OS in particular.

My friend Ian and I were talking and he illustrated a great usage of Xen through his work. What he's ended up doing is installing the Small Business Edition of Server 2003 in a Xen node. The reasoning is that SBE is, apparently extremely difficult to create backups of -- mainly due to odd file locking behavior. I've had similar thoughts, but mainly taking advantage of Xen's migration feature. The idea of taking a small branch office and putting everything on a Xen server is quite appealing to me, especially considering a second server could be used to create virtual hot spare.

As you can see, I like Xen. I've found it relatively easy to install, and the fact that it is starting to come bundled with recent distributions is pretty darn, sweet.

My Portable Travel Stick

Published on

This will be my last post from Taiwan, and I'm placing it in my tech section. Shortly I will be flying to Hong Kong, and then traveling into China. I'm not bringing my laptop with me. I'm always a little wary of using public computers, especially in many of the poorly run internet cafes. Often the logged in user is the administrator, and we all know the computers are obviously crawling with worms and keyloggers. What can I do?

My partner kindly gave me a 128MB flash disk, which is perfect for what I want to do. I've installed the following applications to run directly from it:

  • Portable Clamwin - I plan to fire it up and do a memory scan before I start typing any passwords.

  • Portable Putty - This is useful for two reasons. Firstly, in case my server (or any server with SSH) needs help, I'm on it. Secondly, and more importantly, for security. Putty can easily be used as a SOCKS5 proxy over SSH, so I can tunnel Firefox and IM securely. Password sniffers, be gone! A side benefit is the ability to bypass the "Great Firewall", if needed (e.g. the block my Google account).

  • Portable Miranda - In case I'm feeling home sick, or have some crazy desire to talk on IRC. Don't count on it.

  • Firefox - I tried the Portable Apps package, yet it didn't work.

I noticed in the "known issues" that it doesn't work if loaded on a drive with a non-asci path, which this machine (and those in China) usually have. The "resolution" is to run it in Win98 compat mode, but this didn't work for me. To get around this, I downloaded the normal Firefox, installed it, copied the contents of "Mozilla Firefox" and dumped it in /Firefox. Then I created a profile directory called /FFProfile, and created a bat file called "firefox.bat":
start \Firefox\firefox.exe -profile \FFProfile


Double click the bat file, and you have FF running on your usb drive.
I'm in a search for a better keylogger detector, as I don't know how complete ClamAV will be. If you know of one, let me know. Until then, I'm going to pretend I have the perfect traveling USB companion.

IIS7 GoLive Program

Published on Monday, June 18, 2007

You can easily see that I am a big Linux fan, I've mentioned this over and over. I've also mentioned that I'm finishing up my MCSE, which started as a dare with my buddy, Ian. In the process of studying for my MCSE I've developed a certain amount of respect for Windows Server 2003, yet I'll comment more on this later.

What I really wanted to write two paragraphs about was an interesting discovery I made today. I happened to stumble over to Microsoft's hardware site, and noticed in my little Server Spy monitor that it was running IIS/7 -- the first time I have seen this anywhere. Upon further investigation I perused their GoLive program, which details several ways to test drive IIS7. There are some details about Microsoft's setup, which one would expect to be impressive. And it is. So, if you are a Microsoft person, you may want to grab a test drive of Beta3 while you still can.

Liferea RSS in Liferea

Published on Thursday, June 14, 2007

Today on Linux.com, Liferea was mentioned I find this particularly because I've been using Liferea for quite a few months, and haven't been able to find anything that better suits my needs. It sits quietly in the corner until a new RSS is available, and slightly changes color. Plus, it integrates wonderfully into GNOME.

Well, the Linux.com article does a great job summarizing the reader, so if you are in the market, I'd take a look. For posterities sake, I took a screenshot of the Linux.com feed of Liferea, in Liferea.

Computex 2007 Review

Published on

The buzz of Computex is finally wearing off, so I'll finally scribe my account of the event. YS was kind enough to go with me, we actually called it a date. The scene was quite similar to the trade shows we saw last year, however there seemed to be fewer people. This might be because we went on the final day, although we suspect there weren't that many people because there aren't "sweet" deals to be had. Regardless, there were several main "halls" filled full of stuff. The first three (two were in one building) weren't particularly interesting. I mean, there were some cool displays and lots of technology, but nothing that left me thinking "oh, that's cool" or "oh, me wanna." Until we hit the last hall.

The first place we stumbled upon was the SunComm booth, which seemed to have more "traffic" than any of the other VoIP booths. Let me say this: I think VoIP stuff is awesome, that it is going to be the future, and I dig looking at demos. Even though the SunComm website pretty much looks like crap, their products are way cool. I was lucky enough to purchase a phone directly from them, and have it mailed directly to my house in Taipei (which was just around the corner from their office). They don't normally do this.


Next up was one of the main reasons I even wanted to go to Computex: to see the OpenMoko phone. To be honest with you, if I had a million dollars, this would be one of the first things I would buy. The other would be a new ThinkPad X61s. So why is this phone so cool? First off, it is based on Linux, which if you haven't gathered, I like. The entire stack is open, or nearly open. I've always purchased pretty crap phones, or been given them for free. The reason I do this is because my requirements have never been met: I want a SIP/IAX client on a wifi tri (or preferably quad) band phone. GPS is a plus, but not necessarily required. So far, I haven't been able to fine anything that has suited my needs -- the HTC Universal almost would work, apparently. The slogan is "Free Your Phone", but I think of this project more to "make your phone never become obsolete." Indeed, the hardware may become obsolete, but the software never will. I keep being reminded that this project could *really* put a dent in the future iPhone sales. I can't wait to get one with WiFi and start hacking on it -- in the meantime, I'll need to refresh my C.


Up next, directly across the aisle, was Via's new line of motherboards. At Computex there were quite a few small sets of motherboards, but nothing quite like this. Smaller than mini-itx. Smaller than nano-itx. We have pico.

This thing is freaking small. Seeing this little board made me realize my desire to minimize how much (and the size) of the technology I own. Currently I'm selling my AMD Athlong64 3000 (it has two gigs of RAM), and will at some point attempt to switch to a single laptop solution (with Xen, of course). At the same time, I'm considering how useful one of these little boards could be. Many have two NICs, which would make perfect routers. I've seen some boards for as inexpensive as $65usd.

Tunneling over SSH

Published on Thursday, June 7, 2007

As a rule, whenever I'm online I'm logged into my server back in the States. I'm also usually wireless, which we all know is beyond insecure -- I've found it especially useful to tunnel firefox over SSH. I try my best to tunnel stuff over SSH back, and if you want to also, this is how.

Setup the SSH/SOCKS tunnel

I'm on Linux, so this is pretty darn easy.
ssh user@domain.com -D 1080

If the SSH daemon runs on a different port, you'd do something like this:
ssh -oPort=1234 user@damon.com -D 1080

Remember ports below 1024 are reserved, and you would need root access. Now it is time to configure the different programs to use the newly created tunnel.

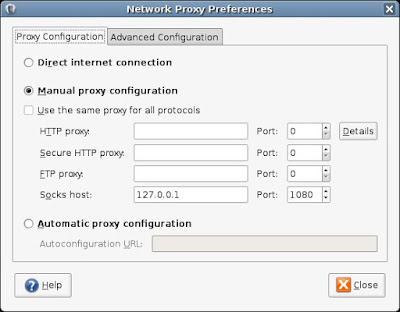
Setting up Gnome (optional)

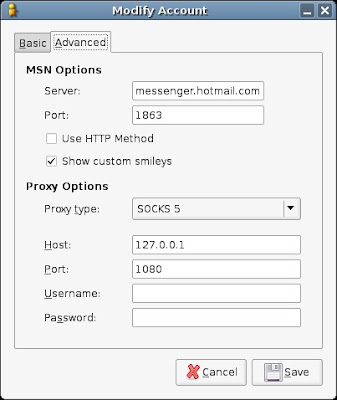
Tunneling Pidgen

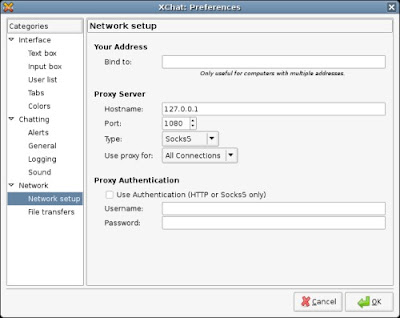
Tunneling XChat

Tunneling Firefox
Note: I'm going to list two examples, one is with FoxyProxy and the other is with the ordinary proxy settings.

FoxyProxy

Normal Proxy

Make sure the other fields or empty, or you won't connect.

So, there you have it. There are quite a few unix shell providers out there, I'm sure it wouldn't be too hard to spot a link for one. I've seen QuadSpeedInternet having SSH access for $3/month, and JVDS or Lonestar offering possible free shells. Alternatively, you could just get a really inexpensive VPS at VPSLink ($6-$8/month, but they often have 25% off discounts).

Turn Off Google Suggest in Firefox

Published on

I generally like Firefox, and generally like Google. But having Google suggest enabled when I search for things is annoying, at least on my rather small laptop screen. Mostly it is because my internet right now is pretty crap, so I try to cut down on any extra traffic. Anyhow, I didn't even both Googling how to do this:

Type in 'about:config' into your address bar and type 'search' in the top filter bar. Look about half-way down for this:

browser.search.suggest.enabled


Double click it to turn it to false. All done.

Alexa Site Thumbnail with Python

Published on Wednesday, June 6, 2007

For one of my sites I needed to get thumbnails, yet Alexa Site Thumbnail didn't have any code snippets for Python. Well, no they/you do.

ThumbnailUtility.py


import base64
import datetime
import hmac
import sha
import sys
import re
import urllib
import xml.dom.minidom

AWS_ACCESS_KEY_ID = 'your-access-key-id'
AWS_SECRET_ACCESS_KEY = 'your-super-secret-key'

# This one is for an individual thumbnail...
def create_thumbnail(site_url, img_size):
    def generate_timestamp(dtime):
        return dtime.strftime("%Y-%m-%dT%H:%M:%SZ")
    def generate_signature(operation, timestamp, secret_access_key):
        my_sha_hmac = hmac.new(secret_access_key, operation + timestamp, sha)
        my_b64_hmac_digest = base64.encodestring(my_sha_hmac.digest()).strip()
        return my_b64_hmac_digest
    timestamp_datetime = datetime.datetime.utcnow()
    timestamp_list = list(timestamp_datetime.timetuple())
    timestamp_list[6] = 0
    timestamp_tuple = tuple(timestamp_list)
    timestamp = generate_timestamp(timestamp_datetime)
    signature = generate_signature('Thumbnail', timestamp, AWS_SECRET_ACCESS_KEY)
    parameters = {
        'AWSAccessKeyId': AWS_ACCESS_KEY_ID,
        'Timestamp': timestamp,
        'Signature': signature,
        'Url': site_url,
        'Action': 'Thumbnail',
        'Size': img_size,
        }
    url = 'http://ast.amazonaws.com/?'
    result_xmlstr = urllib.urlopen(url, urllib.urlencode(parameters)).read()
    result_xml = xml.dom.minidom.parseString(result_xmlstr)
    image_url = result_xml.childNodes[0].getElementsByTagName('aws:Thumbnail')[0].firstChild.data
    return image_url
  
# And this one is for a list
def create_thumbnail_list(all_sites, img_size):
    def generate_timestamp(dtime):
        return dtime.strftime("%Y-%m-%dT%H:%M:%SZ")
    
    def generate_signature(operation, timestamp, secret_access_key):
        my_sha_hmac = hmac.new(secret_access_key, operation + timestamp, sha)
        my_b64_hmac_digest = base64.encodestring(my_sha_hmac.digest()).strip()
        return my_b64_hmac_digest
    
    timestamp_datetime = datetime.datetime.utcnow()
    timestamp_list = list(timestamp_datetime.timetuple())
    timestamp_list[6] = 0
    timestamp_tuple = tuple(timestamp_list)
    timestamp = generate_timestamp(timestamp_datetime)
    
    signature = generate_signature('Thumbnail', timestamp, AWS_SECRET_ACCESS_KEY)
    
    image_loc = {}
    image_num = []
    image_size = {}
    
    count = 1   
    for s in all_sites:
        image_num = 'Thumbnail.%s.Url' % count
        image_loc[image_num] = s
        count += 1
        
    parameters = {
        'AWSAccessKeyId': AWS_ACCESS_KEY_ID,
        'Timestamp': timestamp,
        'Signature': signature,
        'Action': 'Thumbnail',
        'Thumbnail.Shared.Size': img_size,
        }
        
    parameters.update(image_loc)
    
    ast_url = 'http://ast.amazonaws.com/?'
        
    result_xmlstr = urllib.urlopen(ast_url, urllib.urlencode(parameters)).read()
    result_xml = xml.dom.minidom.parseString(result_xmlstr)
    
    image_urls = []
    count = 0
    for s in all_sites:
        image_urls.append(result_xml.childNodes[0].getElementsByTagName('aws:Thumbnail')[count].firstChild.data)
        count += 1
    return image_urls


This is how you interact with this code for a single thumbnail:
>>> from ThumbnailUtility import *
>>> create_thumbnail('kelvinism.com', 'Large')
u'http://s3-external-1.amazonaws.com/alexa-thumbnails/A46FF6A30BECB0730455F2AB306EDC28605BC19Cl?Signature=XpsxgPey4b0JgreZA46XnvHVVLo%3D&Expires=1181110547&AWSAccessKeyId=1FVZ0JNEJDA5TK457CR2'

And for a list:
>>> from ThumbnailUtility import *
>>> all_sites = ['kelvinism.com', 'alexa.com', 'vpslink.com']
>>> create_thumbnail_list(all_sites, 'Small')
[u'http://s3-external-1.amazonaws.com/alexa-thumbnails/A46FF6A30BECB0730455F2AB306EDC28605BC19Cs?Signature=%2BfcOUKwH4xD9IH9o1vfto%2FMoALU%3D&Expires=1181110698&AWSAccessKeyId=1FVZ0JNEJDA5TK457CR2', u'http://s3-external-1.amazonaws.com/alexa-thumbnails/D798D8CE8F821FCC63159C92C85B70319E44D0EFs?Signature=6jriChrGM%2F8DoejN9dn9Dv3Lc5w%3D&Expires=1181110698&AWSAccessKeyId=1FVZ0JNEJDA5TK457CR2', u'http://s3-external-1.amazonaws.com/alexa-thumbnails/23529C34E0518AA9C2577653AC237D3647BA8D2Ds?Signature=5ksuwZx0I5TqXWL3Kt%2BWP6r2LQk%3D&Expires=1181110698&AWSAccessKeyId=1FVZ0JNEJDA5TK457CR2']


This is just a simple example to get your feet wet, maybe you'll find it useful. If you are wondering how to integrate this with Django, don't worry, I've got you covered.

Alexa Site Thumbnail with Python II

Published on

This is how I actually use Alexa Site Thumbnail, and since I'min a sharing mood, I'll extend the code your way. In short, this takes the url and searches in STORELOC first, then any urls not already in STORELOC are retrieved and named via a slug. You need to pass two variables to either of these: blog_site.url and blot_site.slug -- since I'm using Django, this is naturally how sites are returned after I filter a queryset. What I do is place the call to Alexa as high up the page as I can, and because I've threaded this, the page can continue to load without waiting for Alexa's response. For instance, let's say you have some model with cool sites, and you want to return the sites filtered by owner...

views.py


from getAST import create_thumbnail_list
blog_sites = CoolSiteListing.objects.filter(owner__username__iexact=user_name, is_active=True)
create_thumbnail_list(blog_sites).start()


Notice the .start() on the create_thumbnail_list function? That starts the thread.

getAST.py


import base64
import datetime
import hmac
import sha
import sys
import re
import urllib
import xml.dom.minidom
import os
import threading

AWS_ACCESS_KEY_ID = 'your-access-key-id'
AWS_SECRET_ACCESS_KEY = 'your-super-secret-key'
STORELOC = "/path/to/store/thumbs/"

# This one is for an individual thumbnail...
class create_thumbnail(threading.Thread):
   # Override Thread's __init__ method to accept the parameters needed:
    def __init__(self, site_url, site_slug):
        self.site_url = site_url
        self.site_slug = site_slug
        threading.Thread.__init__(self)
        
    def run(self):
        # First check if the thumbnail exists already
        # site_slug is the name of thumbnail, for instance
        # I would generate the slug of my site as kelvinism_com,
        # and the entire image would be kelvinism_com.jpg 
        if not os.path.isfile(STORELOC+self.site_slug+".jpg"):
            def generate_timestamp(dtime):
                return dtime.strftime("%Y-%m-%dT%H:%M:%SZ")
            def generate_signature(operation, timestamp, secret_access_key):
                my_sha_hmac = hmac.new(secret_access_key, operation + timestamp, sha)
                my_b64_hmac_digest = base64.encodestring(my_sha_hmac.digest()).strip()
                return my_b64_hmac_digest
            timestamp_datetime = datetime.datetime.utcnow()
            timestamp_list = list(timestamp_datetime.timetuple())
            timestamp_list[6] = 0
            timestamp_tuple = tuple(timestamp_list)
            timestamp = generate_timestamp(timestamp_datetime)
            signature = generate_signature('Thumbnail', timestamp, AWS_SECRET_ACCESS_KEY)
            parameters = {
                'AWSAccessKeyId': AWS_ACCESS_KEY_ID,
                'Timestamp': timestamp,
                'Signature': signature,
                'Url': self.site_url,
                'Action': 'Thumbnail',
                }
            url = 'http://ast.amazonaws.com/?'
            result_xmlstr = urllib.urlopen(url, urllib.urlencode(parameters)).read()
            result_xml = xml.dom.minidom.parseString(result_xmlstr)
            image_urls = result_xml.childNodes[0].getElementsByTagName('aws:Thumbnail')[0].firstChild.data
            #image_name = re.sub("\.|\/", "_", result_xml.childNodes[0].getElementsByTagName('aws:RequestUrl')[0].firstChild.data) + ".jpg"
            image_name = self.site_slug + ".jpg"
            store_name = STORELOC + image_name
            urllib.urlretrieve(image_urls, store_name)
            return image_name
  
# And this one is for a list
class create_thumbnail_list(threading.Thread):
   # Override Thread's __init__ method to accept the parameters needed:
   def __init__(self, all_sites):
      self.all_sites = all_sites
      threading.Thread.__init__(self)
   def run(self):     
        SITES = []
        # go through the sites and only request the ones that don't
        # exist yet
        for s in self.all_sites:
            if not os.path.isfile(STORELOC+s.slug+"SM.jpg"):
                SITES.append(s)
                       
        if SITES: 
            def generate_timestamp(dtime):
                return dtime.strftime("%Y-%m-%dT%H:%M:%SZ")
            
            def generate_signature(operation, timestamp, secret_access_key):
                my_sha_hmac = hmac.new(secret_access_key, operation + timestamp, sha)
                my_b64_hmac_digest = base64.encodestring(my_sha_hmac.digest()).strip()
                return my_b64_hmac_digest
            
            timestamp_datetime = datetime.datetime.utcnow()
            timestamp_list = list(timestamp_datetime.timetuple())
            timestamp_list[6] = 0
            timestamp_tuple = tuple(timestamp_list)
            timestamp = generate_timestamp(timestamp_datetime)
            
            signature = generate_signature('Thumbnail', timestamp, AWS_SECRET_ACCESS_KEY)
            
            image_loc = {}
            image_num = []
            image_size = {}
            
            count = 1   
            for s in SITES:
                image_num = 'Thumbnail.%s.Url' % count
                image_loc[image_num] = s.url
                count += 1
                
            parameters = {
                'AWSAccessKeyId': AWS_ACCESS_KEY_ID,
                'Timestamp': timestamp,
                'Signature': signature,
                'Action': 'Thumbnail',
                'Thumbnail.Shared.Size': 'Small',
                }
                
            parameters.update(image_loc)
            
            ast_url = 'http://ast.amazonaws.com/?'
                
            result_xmlstr = urllib.urlopen(ast_url, urllib.urlencode(parameters)).read()
            result_xml = xml.dom.minidom.parseString(result_xmlstr)
    
            count = 0
            for s in SITES:
                image_urls = result_xml.childNodes[0].getElementsByTagName('aws:Thumbnail')[count].firstChild.data
                image_name = s.slug + "SM.jpg"
                store_name = STORELOC + image_name
                urllib.urlretrieve(image_urls, store_name)
                count += 1

Alexa Site Thumbnail And Django

Published on

So, you've seen how to look up thumbnails via python, but wonder how to integrate this with Django? I created a sample app to demonstrate. One thing to note about this app is it is slightly more complex than just using the previously mentioned ThumbnailUtility. For starters, the thumbnail is downloaded from Alexa onto the server. Another part is first searching if the thumbnail exists already, and if it does, serving that instead of querying Alexa. Let's just start with some code.

getAST.py


#!/usr/bin/python
import base64
import datetime
import hmac
import sha
import sys
import re
import urllib
import xml.dom.minidom
import os
from urlparse import urlsplit

AWS_ACCESS_KEY_ID = 'your-access-key-id'
AWS_SECRET_ACCESS_KEY = 'your-secret-key'
STORELOC = "/path/to/store/webthumbs/"

def create_thumbnail(site_url):
image_name = re.sub("\.|\/", "_", '.'.join(urlsplit(site_url)[1].rsplit('.', 2)[-2:])) + ".jpg"
if not os.path.isfile(STORELOC+image_name):
def generate_timestamp(dtime):
return dtime.strftime("%Y-%m-%dT%H:%M:%SZ")
def generate_signature(operation, timestamp, secret_access_key):
my_sha_hmac = hmac.new(secret_access_key, operation + timestamp, sha)
my_b64_hmac_digest = base64.encodestring(my_sha_hmac.digest()).strip()
return my_b64_hmac_digest
timestamp_datetime = datetime.datetime.utcnow()
timestamp_list = list(timestamp_datetime.timetuple())
timestamp_list[6] = 0
timestamp_tuple = tuple(timestamp_list)
timestamp = generate_timestamp(timestamp_datetime)
signature = generate_signature('Thumbnail', timestamp, AWS_SECRET_ACCESS_KEY)
parameters = {
'AWSAccessKeyId': AWS_ACCESS_KEY_ID,
'Timestamp': timestamp,
'Signature': signature,
'Url': site_url,
'Action': 'Thumbnail',
}
url = 'http://ast.amazonaws.com/?'
result_xmlstr = urllib.urlopen(url, urllib.urlencode(parameters)).read()
result_xml = xml.dom.minidom.parseString(result_xmlstr)
image_urls = result_xml.childNodes[0].getElementsByTagName('aws:Thumbnail')[0].firstChild.data
store_name = STORELOC + image_name
urllib.urlretrieve(image_urls, store_name)
return image_name


Not too much to mention here, basically just an extended version of the ThumbnailUtility. The only difference is the test at the beginning, and actually downloading the thumbnail.

views.py


# Create your views here.
from django.shortcuts import render_to_response, get_object_or_404
from django.http import HttpResponseRedirect, HttpResponse
from webthumbs.models import *
from django import newforms as forms
from getAST import create_thumbnail

attrs_dict = { 'class': 'form-highlight' }

class imageForm(forms.Form):
url = forms.URLField(max_length=100, verify_exists=True, widget=forms.TextInput(attrs=attrs_dict), initial='http://', label='Site URL')

def index(request):
disp_img = ''
# generate default form
f = imageForm()
# handle add events
if request.method == 'POST':
if request.POST['submit_action'] == 'Submit':
# attempt to do add
add_f = imageForm(request.POST)
if add_f.is_valid():
site_url = request.POST['url']
disp_img = create_thumbnail(site_url)
else:
f = add_f
return render_to_response(
'webthumbs/index.html',
{'printform': f,
'disp_img': disp_img
}
)


The key thing to look at here is how getAST is called:


site_url = request.POST['url']
disp_img = create_thumbnail(site_url)


index.html


{% extends "base.html" %}

{% block title %}Kelvinism.com - Blog{% endblock %}

{% block content %}

What thumbnail do you want?


{{ printform }}


{% endblock %}


So, there you have it, the code to take a url via form and display it right away.

Adding Search to Django

Published on Sunday, June 3, 2007

This is fairly well documented in the Django docs, so I'll be brief. This is the the bit of search code I use in almost all of my Django sites, and it works great:

def search(request):
    from django.db.models import Q
    q = request.GET.get("q", "")
    if q and len(q) >= 3:
        clause = Q(dirtword__icontains=q)               \
               | Q(description__icontains=q)       \
               | Q(tags__name__icontains=q)        
        site_search = Dirt.objects.filter(clause).distinct()
    else:
        site_search = Dirt.objects.order_by('?')[:100]
    return list_detail.object_list(
        request              = request,
        queryset             = site_search,
        template_name        = "dirty/search.html",
        template_object_name = "dirty",
        paginate_by          = 20,
        extra_context        = {"q" : q},
    )  


While this should be pretty self-explanatory, the process goes like this: q is taken from the GET request and if it is over three characters long, it is searched for in the dirtword column, through the description and also through the m2m relationship of tags__name. Yup, it is pretty nifty to be able to access relationship in this way (tags__name). You will notice that at the end of each search it says "__icontains" -- this simply does a fuzzy search for the word. Once the queryset is created (the filter) I've added a .distinct() on the end --this prevents multiple rows from being returned to the template. If there isn't a search, or it isn't long enough, a random list will be returned.
One thing I like to do is include the search as extra_context -- this allows you to say something like "you've searched for..." at the top of your search. I couldn't imagine implementing a search feature as being any easier.

Django Syndication with Colddirt

Published on

Creating feeds in Django is freaking simple. I'll start with an example of just updating a feed with the newest objects (for instace, newest blog posts). Similar to the forms.py way of handling our different forms, I've created a feeds.py to handle the feeds.

feeds.py


from django.contrib.syndication.feeds import Feed
from colddirt.dirty.models import Dirt

class LatestDirts(Feed):
    title = "Cold Dirt"
    link = "/"
    description = "When you have dirt, you've got dirt.  Right..."
    copyright = 'All Rights Unreserved'
    
    def items(self):
        return Dirt.objects.all()[:50]


What this will do is query our Dirt DB and return an obj. The fields here are pretty well documented in the Django docs, besides being pretty obvious.

urls.py


We need three things in our urls.py -- first, import our feeds from feeds.py:
from colddirt.feeds import LatestDirts


Next, we map the feed we want to a name urls.py can use:
feeds = {
    'newdirt': LatestDirts,
}


Finally we create which URL to use for the feeds:
    (r'^feeds/(?P.*)/$', 'django.contrib.syndication.views.feed', {'feed_dict': feeds}),


When we look at a request, the process goes like this: it comes in as /feeds/newdirt/, which then gets looked up and matches newdirt in the feeds_dict. Next, LatestDirts is looked at and evaluated, and returned. But how is it returned? One final thing to do is create a template for the feed to use, which is where we can tell exactly what is to be displayed to the user.

templates/feeds/newdirt_title.html


{{ obj.dirtword }}

templates/feeds/newdirt_description.html


{{ obj.description }}

The naming for the templates, as usual, is important. If you want to have that little orange RSS button near your url, add this to your template's head:


So, there you have it, a simple example of how to use Django's syndication framework. I'll follow this up with another slightly more complex tutorial.

Django Syndication with Colddirt II

Published on

Since I've already covered a really simple syndication example, I'll move onto something a little more complex. Let's say you want to offer syndication that is slightly more custom. The Django syndication docs give an example from Adrian's Chicagocrime.org syndication of beats. I had to ponder a minute to get "custom" syndication to work, so here's my example from start to finish.
First, as usual, feeds.py

feeds.py


class PerDirt(Feed):

    link = "/"
    copyright = 'Copyright (c) 2007, Blog Mozaic'
    
    def get_object(self, bits):
        from django.shortcuts import get_object_or_404
        if len(bits) != 1:
            raise ObjectDoesNotExist
        my_dirt = get_object_or_404(Dirt, slug__exact=bits[0])
        return my_dirt

    def title(self, obj):
        return obj.slug
    
    def description(self, obj):
        return obj.description
    
    def items(self, obj):
        from django.contrib.comments.models import FreeComment
        return FreeComment.objects.filter(object_id=obj.id).order_by('-submit_date')

You can see that this differs slightly from the simpler syndication example. I'll not a few things. But first, I need to show urls.py:

urls.py


feeds = {
    'mydirt': PerDirt,
}

urlpatterns = patterns('',
    (r'^feeds/(?P<url>.*)/$', 'django.contrib.syndication.views.feed', {'feed_dict': feeds}),
)


Let's pretend the dirt word (or if you were doing a blog, you could do this based on slug) is "nifty". So, the process is like this: a request comes in as /feeds/mydirt/nifty/ -- it is first looked up in the feed_dict (because of the mydirt part) and then sent to PerDict. Once in PerDict it hits the first def, get_object. One of the things that confused me at first is what the 'bits' part is. Simply put: it is the crap after you tell Django which feed to use. Similar to the beats example, I'm testing to make sure the length is only one -- so if the word doesn't exist or somebody just types in feeds/mydirt/nifty/yeehaaa/ -- they will get an error. Next the object is looked up, in this case the dirt word (in your case, maybe a blog entry).
The title and description are self-explanatory. The items are a query from the FreeComment database, ordered by date. What we need next is the correct templates.

templates/feeds/mydirt_title.html


Comment by {{ obj.person_name }}


Once again, the filename is important (mydirt_title). obj.person_name is the name from the comment.

templates/feeds/mydirt_description.html


{{ obj.comment }}
Posted by: {{ obj.person_name }}
Published: {{ obj.submit_date }}


If you are curious how to get that little orange icon next to your site's url, you do this:


That's it. Hopefully I've explained how to create somewhat custom syndication feeds, in case you needed another example.

Simple Ajax with Django

Published on Friday, June 1, 2007

So, the Django developers, in my opinion, are freaking smart. Instead of bundling Django with a particular library, they have added XML and JSON serialization; us humble users can choose whatever AJAX library we want. Prototype 1.5.1 has been pretty fun to work with, so I'll kick off this demo with a really simple example.
How simple? The intended goal is to have the total number of 'dirts' update without user intervention. Laaaammmeee. If you are a visual type of person, take a look on the Colddirt huh page. That number automatically increases without user intervention. And this is how.
The process (some pseudocode) will go like this:

check /dirt_count/ for an update

if update:

make number bigger

else:

check less frequently


Pretty simple, eh?

urls.py


    (r'^dirt_count/$', views.dirt_count),

As you can see, it just sends the request to the view.

views.py


def dirt_count(request):
    from django.http import HttpResponse
    countd = str(Dirt.objects.all().count())
    return HttpResponse(countd, mimetype='text/plain')


Pretty simple -- count the dirts. That makes sense.

dirty.js


new Ajax.PeriodicalUpdater('dirtcount', '/dirt_count/', {
  method: 'get',
  frequency: 3,
  decay: 2,
});


Yea, Prototype makes that real easy. Just make sure to have a element in your template somewhere with an id of 'dirtcount'.

templates/huh.html


0

Django Newforms Usage in Colddirt

Published on

I hear many complaints and questions about newforms, but I've personally found it rather easy and logical to use. There are numerous ways for you to use do forms in Django, and most likely the best way to see them all is to read the docs. On the Colddirt demo site, this is how I used newforms. I'll take the index page as an example.
I've accessed the newforms module like so:
from django import newforms as forms


The next thing to look at is the actual creation of the form. You can keep your forms in models.py, although there is a trend going to keep them in a forms.py file. That is they are for Colddirt.

forms.py


attrs_dict = { 'class': 'norm_required' }
tag_dict = { 'class': 'tag_required' }

class DirtyForm(forms.Form):
    description = forms.CharField(widget=forms.Textarea(attrs=textbox_dict), label='What\'s your cold dirt?')
    tag_list = forms.CharField(max_length=150, widget=forms.TextInput(attrs=tag_dict), label='Tags')


I'm keeping it simple for now. Some key things to note is the field type (CharField) and the widget type (Textarea/TextInput). You can guess what each means. Here's a gem for your tool chest: how do you apply CSS to the forms? That is what the 'attrs=' part is about -- that will put in a class for you to assign CSS to. Nifty. The label creates a 'label' element that you can access. Let's render the form and send it to the template.
To get a form displayed we need to generate the form, and send it to the template.

views.py


dirt_form = DirtyForm() 


Send it to the template.

views.py


    return list_detail.object_list(
           request,
           queryset = Dirt.objects.order_by('?')[:100],
           template_name = "dirty/dirt_list.html",
           template_object_name = "dirty",
           paginate_by = 10,
           extra_context = {'form': dirt_form.as_ul()}
        )


That's it, although we will revisit this index view shortly. One important thing to note is the .as_ul() appended to the form element. This tells the template to encapsulate the form elements as list elements (as opposed to say, a table). Now, let's display the form.

templates/dirt_list.html


{% if form %}
        
    {{ form }}
{% endif %}


The form thus appears because of the block, {{ form }}. You can see in the action type that it will post the data to the index page->view. Let's revisit the entire index view now.

views.py


def index(request):
    import re
    from django.template.defaultfilters import slugify
    dirt_form = DirtyForm()
    if request.method == 'POST':
        dirt_form = DirtyForm(request.POST)
        if dirt_form.is_valid():
            # I opted not to create an m2m relationship for several
            # reasons. Note: the latest_word is some random word.
            latest_word = Word.objects.filter(is_taken__exact=False).order_by('?')[:1]            
            latest_word[0].is_taken=True
            latest_word[0].save()
            new_dirt = Dirt(description=dirt_form.clean_data['description'],
                            dirtword=latest_word[0].dirtyword)
            new_dirt.save()
            # Credit for the tag parsing goes to Ubernostrum (James B)
            # from the Cab (great for learning!) project
            # I opted to not store tag_list in each entry
            # Splitting to get the new tag list is tricky, because people
            # will stick commas and other whitespace in the darndest places.
            new_tag_list = [t for t in re.split('[\s,]+', dirt_form.clean_data['tag_list']) if t]
            # Now add the tags
            for tag_name in new_tag_list:
                tag, created = Tagling.objects.get_or_create(name=slugify(tag_name), slug=slugify(tag_name))
                new_dirt.tags.add(tag)
            return HttpResponseRedirect(new_dirt.get_absolute_url())
    return list_detail.object_list(
           request,
           queryset = Dirt.objects.order_by('?')[:100],
           template_name = "dirty/dirt_list.html",
           template_object_name = "dirty",
           paginate_by = 10,
           extra_context = {'form': dirt_form.as_ul()}
        )


Let me pretend I am the form and have just been submitted to the view. First I'm tested if I'm a POST. Next, my data is dumped into the dirt_form variable. I'm then tested if I'm valid data or not (validation explanation next). Since I'm valid data, stuff happens. In the instance of Colddirt, a random word is taken from the Word database. The word is then updated as is_taken, and saved. Then the dirt is actually created. One thing to notice is how we access form data:
description=dirt_form.clean_data['description']


So, the new dirt (with description and new word) is saved. Next, let's deal with the tags. Credit goes to James for parsing the tag_list.
            new_tag_list = [t for t in re.split('[\s,]+', dirt_form.clean_data['tag_list']) if t]
            # Now add the tags
            for tag_name in new_tag_list:
                tag, created = Tagling.objects.get_or_create(name=slugify(tag_name), slug=slugify(tag_name))
                new_dirt.tags.add(tag)


You can see dirt_form.clean_data used again. Another neat trick is to use slugify to make sure your tags are lowercase and aren't all weirdo like. The user is then redirected to the absolute url of the dirt the just created.
So what about validation? Don't think I forgot this one. Validation (from what I have seen) is actually really easy. I'm going to first display the entire form.

forms.py


class DirtyForm(forms.Form):
    description = forms.CharField(widget=forms.Textarea(attrs=textbox_dict), label='What\'s your cold dirt?')
    tag_list = forms.CharField(max_length=150, widget=forms.TextInput(attrs=tag_dict), label='Tags')
 
    def clean_description(self):
        import re
        if self.clean_data.get('description'):
            value = self.clean_data['description']
            if len(value) > 20 and not re.search('[<>]', value):
                try: 
                    hasNoProfanities(value, None)
                    return value
                except:
                    raise forms.ValidationError(u'Extremily dirty words, racial slurs and random crap characters are not allowed in dirt.') 
            else:
                raise forms.ValidationError(u'A little more detail please. No HTML.')
               
    def clean_tag_list(self):
        if self.clean_data.get('tag_list'):
            value = self.clean_data['tag_list']
            try: 
                hasNoProfanities(value, None)
                return value
            except:
                raise forms.ValidationError(u'Extremily dirty words or racial slurs are not allowed!') 


There is a fair amount of normal validation that occurs in the is_valid process, but here is some extra validation I added. Inside the DirtyForm class (as you can see) simply add a test for if the data is 'clean' or not (I don't know how to beter phrase this -- "send the data to the cleaners"). I'm testing the description to make sure it is long enough, and to make sure it doesn't have <>'s in it (to prevent XSS and odd stuff). If it detects them, the lower error is displayed. I've also tied in the hasNoProfanities validation, which pulls the words from my settings file. Not that I care if people swear or not, I'm mainly using this to prevent racial slurs, which I do care about.
So, there you have it, one example of how newforms is used in a 'live' site. I hope this is helpful for somebody, I wish I could have seen more newforms examples when I started learning. If you are truly stumped on something, take a look inside the django source (/tests/regressiontests/forms/tests.py) for a lot of examples of every way you could use newforms.