A few weeks ago I saw an opening to give a 5-10 minute lightening talk at SyPy (Sydney Python), and with two nights to prepare, decided it would be interesting to explore Splunk's usage of Python. Below was the quick presentation I gave.
Enable ICMP through UFW
Published on Tuesday, September 21, 2010
I like using Ubuntu's UFW command, but today I needed to allow outgoing ICMP. I received results as so:
$ ping 4.2.2.2
PING 4.2.2.2 (4.2.2.2) 56(84) bytes of data.
ping: sendmsg: Operation not permitted
ping: sendmsg: Operation not permitted
ping: sendmsg: Operation not permitted
To allow outbound icmp I edited 'before.rules' and added the following lines.
$ sudo vi /etc/ufw/before.rules
# allow outbound icmp
-A ufw-before-output -p icmp -m state --state NEW,ESTABLISHED,RELATED -j ACCEPT
-A ufw-before-output -p icmp -m state --state ESTABLISHED,RELATED -j ACCEPT
Using HTML in a Django form label
Published on Sunday, July 11, 2010
I recently had the need to add some HTML to the label for a form field using Django. The solution is pretty easy, except I didn't see it written explicitly anywhere, and I missed the memo of the function I should be using.
My form first just had the HTML in the form label as so:
However, when I displayed it, the form was autoescaped.
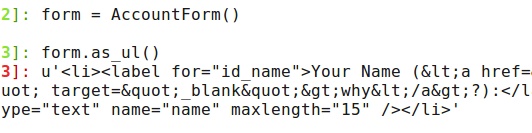
This is generally a good thing, except my form obviously didn't display correctly. I tried autoescaping it in the template, but that didn't work. To resolve this you'll need to mark that individual label as safe. Thus:
It will now display correctly:
'
There's maybe another easier way to do this, but this worked for me.
My form first just had the HTML in the form label as so:
from django import forms

class AccountForm(forms.Form):
    name = forms.CharField(widget=forms.TextInput(), max_length=15, label='Your Name (why?')
However, when I displayed it, the form was autoescaped.

This is generally a good thing, except my form obviously didn't display correctly. I tried autoescaping it in the template, but that didn't work. To resolve this you'll need to mark that individual label as safe. Thus:
from django.utils.safestring import mark_safe
from django import forms

class AccountForm(forms.Form):
    name = forms.CharField(widget=forms.TextInput(), max_length=15, label=mark_safe('Your Name (why?)'))
It will now display correctly:
In [1]: from myproject.forms import *

In [2]: form = AccountForm()

In [3]: form.as_ul()
Out[3]: u'
There's maybe another easier way to do this, but this worked for me.
Ubuntu 10.04, Django and GAE - Part 2
Published on Saturday, June 12, 2010
All my Django sites are running 1.2, which poses a conflict with writing apps for Google's App Engine, as use_library currently only supports < Django 1.1. There are two solutions that I found: a) use virtualenv, or b) chroot, which I've already detailed. This document will hopefully show you how to create a virtual environment to use a secondary django version, especially for GAE. Of the two options, I think this one is a bit quicker, but there will likely be tradeoffs that a chroot environment can deal with better, e.g. python imaging (I don't use it for GAE).
First, install PIP and virtualenv:
Second, configure an environment for any app that will use Django 1.1:
Now, download the python GAE sdk and put it in the django-1.1 folder. I also just dump any project directory requiring Django 1.1 into this django-1.1 folder, although I guess you could create a virtualenv for each project. The last thing to do is start the virtual environment, and run the GAE app.
When you're all finished, you can jump out of virtualenv:
Update: You'll find this article especially interesting if you get an error such as the following:
First, install PIP and virtualenv:
kelvinn@kelvinn-laptop:~/workspace$ sudo easy_install -U pip
kelvinn@kelvinn-laptop:~/workspace$ sudo pip install -U virtualenv
Second, configure an environment for any app that will use Django 1.1:
kelvinn@kelvinn-laptop:~/workspace$ virtualenv --python=python2.5 --no-site-packages django-1.1
New python executable in django-1.1/bin/python
Installing setuptools............done.
kelvinn@kelvinn-laptop:~/workspace$ pip install -E django-1.1 yolk
kelvinn@kelvinn-laptop:~/workspace$ pip install -E django-1.1 Django==1.1
Now, download the python GAE sdk and put it in the django-1.1 folder. I also just dump any project directory requiring Django 1.1 into this django-1.1 folder, although I guess you could create a virtualenv for each project. The last thing to do is start the virtual environment, and run the GAE app.
kelvinn@kelvinn-laptop:~/workspace$ source django-1.1/bin/activate
(django-1.1)kelvinn@kelvinn-laptop:~/workspace$ yolk -l
(django-1.1)kelvinn@kelvinn-laptop:~/workspace$ cd django-1.1
(django-1.1)kelvinn@kelvinn-laptop:~/workspace/django-1.1$ ls
bin  google_appengine  include  lib  myproject1 myproject2
(django-1.1)kelvinn@kelvinn-laptop:~/workspace/django-1.1$ google_appengine/dev_appserver.py myproject1
When you're all finished, you can jump out of virtualenv:
(django-1.1)kelvinn@kelvinn-laptop:~/workspace/django-1.1$ deactivate
Update: You'll find this article especially interesting if you get an error such as the following:
UnacceptableVersionError: django 1.1 was requested, but 1.2.0.beta.1 is already in use
Ubuntu 10.04, Django and GAE - Part 1
Published on
I've started to get into Google's App Engine again, and have started developing a simple product that I had a use for. The initial first draft was a quick 200 lines in webapp, and it worked great. However, I'm starting to find certain things quite cumbersome. I'm a huge fan of Django, and but also about keeping things as simple as possible, which is why I picked webapp to begin with.
I'm now considering making a swap to Django, but there are some development issues; namely, I'm using Ubuntu 10.04, Python 2.6, and Django 1.2. This setup presents several setbacks, as GAE has the requirement of Django 1.1 and Python 2.5. There are two solutions that I found: a) use virtualenv, which I've detailed, or b) chroot. This document will hopefully show how to configure a chroot environment of Ubuntu 9.10 and prepare it for Django on GAE. Using a jailed environment should allow you to edit your code with your normal IDE and VCS, but use Django 1.1 and Python 2.5.
First, I installed schroot and debootstrap.
Second, I edited /etc/schroot/schroot.conf and added the following section to the end.
Third, I created the directories needed for the jailed environment and installed karmic.
Forth, I logged into the jailed environment and updated packages, installed Python 2.5 / Django 1.1. Make sure to note that I don't call 'python', I call 'python2.5'.
Lastly, I log in as my normal user, and start the app. Let's say I have a folder called '~/gaeapps' for my GAE stuff, and that's where I put the SDK.
I'm now considering making a swap to Django, but there are some development issues; namely, I'm using Ubuntu 10.04, Python 2.6, and Django 1.2. This setup presents several setbacks, as GAE has the requirement of Django 1.1 and Python 2.5. There are two solutions that I found: a) use virtualenv, which I've detailed, or b) chroot. This document will hopefully show how to configure a chroot environment of Ubuntu 9.10 and prepare it for Django on GAE. Using a jailed environment should allow you to edit your code with your normal IDE and VCS, but use Django 1.1 and Python 2.5.
First, I installed schroot and debootstrap.
$ sudo apt-get install schroot debootstrap
Second, I edited /etc/schroot/schroot.conf and added the following section to the end.
[karmic]
description=karmic
type=directory
location=/var/chroot/karmic
priority=3
users=kelvinn #your username goes here
groups=admin
root-groups=root
run-setup-scripts=true
run-exec-scripts=true
Third, I created the directories needed for the jailed environment and installed karmic.
$ sudo mkdir -p /var/chroot/karmic
$ sudo debootstrap --arch i386 karmic /var/chroot/karmic
Forth, I logged into the jailed environment and updated packages, installed Python 2.5 / Django 1.1. Make sure to note that I don't call 'python', I call 'python2.5'.
$ sudo schroot -c karmic
(karmic)root@kelvinn-laptop:~# apt-get update
(karmic)root@kelvinn-laptop:~# apt-get install python2.5
(karmic)root@kelvinn-laptop:~# cd /usr/src
(karmic)root@kelvinn-laptop:~# apt-get install wget
(karmic)root@kelvinn-laptop:/usr/src# wget http://www.djangoproject.com/download/1.1.2/tarball/
(karmic)root@kelvinn-laptop:/usr/src# tar -xpzf Django-1.1.2.tar.gz
(karmic)root@kelvinn-laptop:/usr/src/Django-1.1.2# python2.5 setup install
(karmic)root@kelvinn-laptop:/usr/src/Django-1.1.2# exit
Lastly, I log in as my normal user, and start the app. Let's say I have a folder called '~/gaeapps' for my GAE stuff, and that's where I put the SDK.
$ scroot -c karmic
(karmic)kelvinn@kelvinn-laptop:~/gaeapps$ ls
google_appengine  myproject
(karmic)kelvinn@kelvinn-laptop:~/gaeapps$ google_appengine/dev_appserver.py myproject
Debug Postfix Tip
Published on Thursday, May 20, 2010
One thing I love about open source stuff is that the developers usually take great care to allow awesome debug messages. There's a catch-22, however: how much logging to enable? Today I was creating a Postfix/Dovecot/Postgresql install and I kept getting an error message in mail.log, but it wasn't very helpful.
Luckily you can turn up the verbosity in Postfix for error messages. You'll need to find out what component is in error, e.g. "postfix/virtual[4467]: warning:", and then open master.cf. Add a -v to the end of the daemon that's faulting, and you'll get more logging than you know what to do with.
virtual unix - n n - - virtual -v
I hope this helps somebody. You can read more debugging tips on the Postfix DEBUG readme.
Retiring Old Websites
Published on Sunday, May 16, 2010
Sometimes all good things come to an end. There aren't too many links going into either of these sites, but I'd like to redirect all of them to a page on my blog saying the website doesn't exist anymore. I've already created simple screendumps for nostalgic purposes with the Firefox plugin Screengrab!, so the remaining simple server-side steps are:
- 1) Edit the DNS records from the live server to the server with the notice page is on.
- 2) Create a new vhost on the server the notice exists on, add old websites as ServerAlias.
- 3) Add a redirect in the vhost to the notice about the retired sites.
- 4) Reload apache config.
The below vhost entry will redirect any link to the retired sites to the notice page.
ServerName ducktracker.com
ServerAlias www.ducktracker.com blogmozaic.com www.blogmozaic.com

RedirectMatch permanent (.*)$ http://www.kelvinism.com/tech-blog/rip-old-sites/
Retiring Another Site
Published on
After much consideration, I've decided to retire yet another website: Colddirt. This site was created as an example of how to use the different parts of Django, mostly in just one afternoon. I've decided it is time to just take a few screenshots and retire the site - the domain is expiring, and honestly, I don't want to spend $10 to renew the domain. So, here are the screenshots.


RIP Old Sites
Published on
Over the years I've created several websites, some with the hope of becoming big and popular. Naturally, I'm still waiting to create a site that becomes big and popular. In the meantime, it seems appropriate to retire some of the older sites and ideas. The truth is, I'm moving all my little sites from MySQL on a mediocre VPS to Postgresql on EC2.
Because I put some sweat and blood into these sites, I thought it would be only appropriate to record how the sites looked for future sentimental value. I downloaded a small plug-in for Firefox to take full-length pictures, and I thus post them here.
Back in Taiwan I created a site to demo blogs. The idea certainly wasn't revolutionary, but I thought that somebody would find it useful. Nope.
The second idea was to send a bunch of little ducks around the world and track their progress. My friend Jamie took one to Europe, but besides that, I don't think most people really understood that they were supposed to hand the duck off to somebody else. The main reason I created the site was because my partner was out of town. I'll re-brand and launch it again if I can find a little twitter logo to send around, because hopefully people on twitter will understand to pass the duck onwards.
So photos for nostalgic sake.

It is always a bit rough retiring old sites, but looking back I learned a little, had some hope, and that's all I can ask for.
Fun with OSM
Published on Friday, February 12, 2010
I have to admit, to me, editing OpenStreetMap is actually a little therapeutic. Sort of like gardening.
My first major contribution was when I brought my little QStarz GPS unit across Indonesia, by train, sitting against the window.
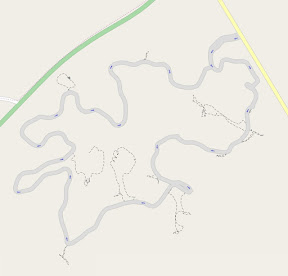
The most recent contribution was our trip to Dubbo, where I helped fill in a few missing roads, and added an initial outlay of Dubbo Zoo.
If you have a GPS or have $60 to spend on one, and like anything CAD-drawing like, give editing OSM a try!
Reduce Bandwidth By Shrinking Images
Published on Sunday, January 24, 2010
My girlfriend's brother has a simple WordPress-based website that I set up for him a few year ago - and he likes to post a lot of images. For various reasons I have it hosted on my VPS in Australia, which only comes with 15GB of bandwidth, most likely because I got a crazy good deal on it.
The problem is, that isn't much bandwidth. Each page of his site was previously using almost 10MB of bandwidth per view - which meant the 15GB was running out. I deduced the high usage in Firebug and noticed it was *gasp* from large images, some almost 1MB large. The images on the server are contained in subdirectories under a gallery folder - and I wanted to resize them. What I actually wanted to do was:
1) If the image was over 1024x900, resize it.
2) If the image size (bytes) was over X, lower the quality.
I ended up using ImageMagick, which is what first obviously came to mind for image manipulation. While there is likely a better way to resize all the images, this is what I came up with. Maybe somebody else will find it useful too.
for dir in /home/vhosts/website.com/html/wp-content/gallery/*
do
cd $dir
for filename in *.jpg
do
echo Filename: "$filename"
width=`identify -ping -format %w "$filename"`
height=`identify -ping -format %h "$filename"`
if [ $width -ge 1024 -a $height -ge 900 ]; then
convert "$filename" -resize "%80>" "$filename"
echo New Dimensions: $width x $height
fi
filesize=`stat -c%s "$filename"`
if [ $filesize -ge 414981 ]; then
convert "$filename" -quality 90 "$filename"
echo Old Filesize: $filesize
echo New Filesize: `stat -c%s "$filename"`
fi
done
done
Save it as "resize.sh" and run it with "bash resize.sh". The output:
Filename: img_5364.jpg
Old Filesize: 950748
New Filesize: 331426
Filename: img_5366.jpg
Filename: img_5367.jpg
Filename: 1c10_1.jpg
Filename: 1.jpg
Filename: 2752_1.jpg
Filename: 42920014.jpg
New Dimensions: 1544 x 1024
Filename: 42920017.jpg
New Dimensions: 1544 x 1024
French Word Collage
Published on Friday, January 1, 2010
For the last year YS and I have been studying French once a week (4.5hr on Saturday!) A few months ago I wrote some Python code to read the RSS feeds of the most popular French newspaper site, and then kept track of the count of each word. I repeated this every week for a few months.
In the end I had a database of the top ~3000 words used on the site. Today I decided I wanted to play with Processing, so created this little word collage. It is 1680x1050, my monitor's resolution. Two thumbs up for Processing!

In the end I had a database of the top ~3000 words used on the site. Today I decided I wanted to play with Processing, so created this little word collage. It is 1680x1050, my monitor's resolution. Two thumbs up for Processing!

Subscribe to:
Posts (Atom)